Before purchase following questions should be considered:
Rotary Indexing Table directly integrated machine control (as one or more machine axes)
Rotary Indexing Table integrated by separate control (communication via M-command of machine)
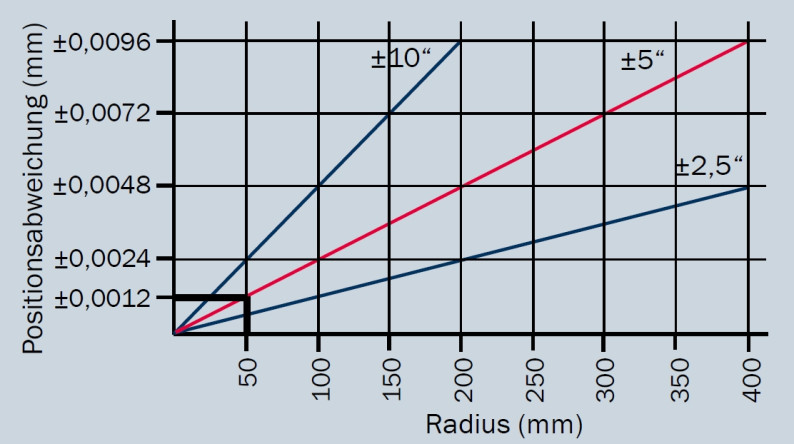
The diagram shows that for small workpiece diameters, linear positioning error (straight distance) is low; for larger workpiece diameters, larger deviations may occur.
Standard angle encoders with an accuracy of +/-5" or +/-10" are used (other accuracies on request).

1. Mode of operation
- Rotary Indexing Tables single-axis
- Rotary Indexing Tables multiple-axis
2. Workpiece and fixture sizes
- geometry
- weight
- mass moment of inertia
3. Type of axes – activation of Rotary Indexing Tables
Rotary Indexing Table directly integrated machine control (as one or more machine axes)
- Advantages
No additional control necessary
Simultaneous operation (Turn & Burn) possible
Cost-saving and highly efficient manufacturing solution for modern machines - Disadvantages
Applicable only on machines prepared for it
Rotary Indexing Table integrated by separate control (communication via M-command of machine)
- Advantages:
Universal solution for all Rotary Indexing Tables
Quickly applicable on other machines (WEDM, SEDM, EDM drilling) - Disadvantages:
Additional, separate control necessary
For positioning or rotation only, simultaneous operation (Turn & Burn) not possible
4. Selection of measuring system accuracy
Accuracies of Rotary Indexing Tables are proportionally dependent on the accuracy of direct measuring systems (angle encoders, encoders). They are available in various classes of accuracy (higher accuracy = higher price).The diagram shows that for small workpiece diameters, linear positioning error (straight distance) is low; for larger workpiece diameters, larger deviations may occur.
Standard angle encoders with an accuracy of +/-5" or +/-10" are used (other accuracies on request).
Example
Maximum positioning error is dependent on system accuracy and workpiece diameter.| Workpiece radius | 50 mm | 100 mm |
| Measuring system accuracy +/- 5 seconds | +/- 0,0012 | +/- 0,0024 |
| Measuring system accuracy +/- 10 seconds | +/- 0,0024 | +/- 0,0048 |
